

The engine is in, the hoses are clamped, and turning the key gives you an idle that sounds right. Most people relax at that point. The work that decides whether the swap lasts is still ahead, and it is spread over the next several weeks.
A used engine from Japan, such as the units under 65,000 miles that Texas JDM Motors sources for US buyers, has already been broken in once. Its piston rings have seated against the cylinder walls, and its bearings have already worn in. So the classic new-engine break-in advice only half applies, and the other half is where swaps go wrong: fresh gaskets, new hoses, trapped air, assembly debris, and sensors that have not yet reported to the computer.
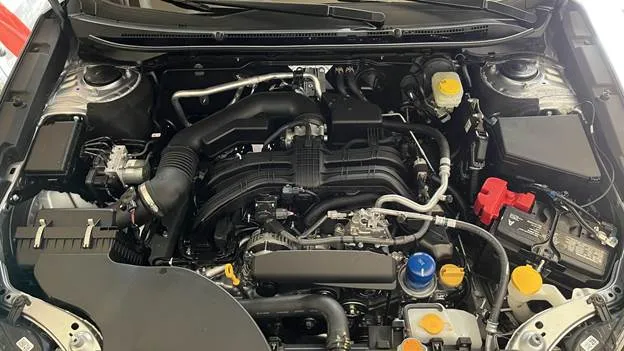
Several things you will check in the first miles are visible here: oil, coolant, hoses, and the battery. Photo: Colin Venable, CC0
The engine break-in period, adjusted for a used engine
Honda’s owner support site says that for most vehicles it recommends avoiding sudden acceleration, full-throttle operation, and trailer towing during a new vehicle’s first 600 miles, and avoiding hard braking during the first 200. That guidance is written for new cars. Still, it makes a sensible template for a car that just got a different engine, because gentle, varied driving costs nothing and protects parts that may be new to the car even if they are not new to the engine.
Think of the break-in period as four checkpoints rather than one long wait, and read your owner’s manual for any model-specific limits on engine speed and load.
Checkpoint 1: the first start
Before the key turns, confirm the oil level on the dipstick and the coolant level in the reservoir. On the first start, watch the oil pressure light or gauge, not the tachometer. Engine builders who ship new crate engines say the same thing in their installation guides: during the first run, check oil pressure, coolant temperature, and every connection for leaks. Slide a sheet of cardboard under the car. Drips show up on it quickly, and the color tells you which fluid it is.
Keep the revs low and let the engine reach normal temperature while you inspect the engine bay. Listen for a ticking that does not fade as oil circulates, a squeal from a freshly installed belt, or a hiss from a vacuum line you forgot to reconnect.
Checkpoint 2: day one and the cooling system
Air trapped in the cooling system is the quiet killer of engine swaps. One Subaru engine supplier says in its published bleeding guide that trapped air is hard to purge when a replacement engine is installed. It tells installers to raise the front of the car, fill through the highest point, run the engine with the heater set to hot until the thermostat opens, and expect warm air from the vents. If the air is cold, stop and repeat the bleeding process. Then comes the step people skip: leave the car overnight and recheck the coolant level in the morning. The same supplier excludes from warranty coverage any head gasket damage caused by improper bleeding, which shows how seriously it takes the point.
Your engine may bleed more easily than a Subaru boxer. The principle holds for any engine. Check the level cold, never open a hot cap, and watch the temperature gauge on every drive that first week.
Checkpoint 3: the first drives and the warning light
A swap often disturbs the battery connection, and that matters more than you might think. The Texas Department of Public Safety says disconnecting the battery is the most common reason emissions monitors read “Not Ready” at an inspection. In Texas emissions counties, a 2001 or newer vehicle with two or more non-continuous monitors not ready fails the test. A 1996 to 2000 vehicle fails with three or more. If a scan tool shows monitors not ready after the swap, the usual fix is simply more normal driving, not more parts.
A check engine light in this window deserves a scan, not a guess. Misfire codes, oxygen sensor codes, and poor idle quality after a swap often trace to an unplugged connector or a vacuum leak, and both kinds of problem are far cheaper to fix when caught in the first week.
Checkpoint 4: the rest of the first thousand
Here is where discipline pays off. Vary your pace, skip long steady cruises at one throttle setting, leave the trailer in the driveway, and avoid full throttle. One engine builder asks owners to run a 500-mile break-in on conventional oil with no synthetic, a rule meant for its freshly assembled engines. A used import does not need that rule, but it does need an early oil and filter change. Assembly lubricant, sealant residue, and debris from the install end up in the pan. Have that service done within the first few hundred miles unless your shop or the seller’s paperwork gives a different interval, and cut open the old filter to see what it caught.
From then on, check the oil level at every fill-up through the whole first stretch. Seeing a pattern in the first weeks tells you whether consumption is normal for that engine.
|
When |
What to do |
What it catches |
|
First start |
Check oil pressure, leaks, and how it runs |
Missed connections, low oil |
|
Next morning |
Recheck the coolant when cold |
Trapped air |
|
First drives |
Scan for codes and readiness status |
Sensor faults and vacuum leaks |
|
Early service |
Change oil and filter |
Installation debris |
|
Weeks two to six |
Weekly fluid and belt check |
Slow leaks, belt wear |
What should send you back to the shop?
Stop driving and call for help if the oil light flickers, the temperature needle climbs past its usual spot, you smell sweet coolant, you hear a knock that grows with load, or you see steady blue smoke after warm-up. None of these will improve if you keep driving.
If a shop did the install, ask for three things in writing: which fluids and how much went in, how the cooling system was bled, and whether any codes were stored when the car left the bay. A shop worth hiring will have those answers ready, and a DIYer should keep the same notes in the glove box. A swap that goes wrong a few weeks in often traces back to one of the boring steps above, not to the engine itself.
